


Ok ladies! Let’s all admit that being a mom is exhausting. That sometimes there are priorities and getting your kids dressed and presentable usually comes before yourself. We can also say that every now and then if feels so good to get all dolled up for date night and feel amazing about yourself! So what makes date night even better aside from freshly washed hair and an outfit other than mom jeans and a v-neck?….some ah-mazing makeup for that added touch!
I recently started playing around with contouring. You know, all the fabulous-ness you see all over Pinterest that looks way easier than it actually is? I mean really, Kim K makes it look effortless and with Pinterest to help us in all of our DIY good-ness, why not?! I have to add that I am in no way a make-up expert…just a mom, with some decent makeup on a mission to look presentable in public. I started by doing a little research (because when you have no idea what your doing and toting a tantrum prone toddler to the mall is not an option, the internet is your friend). I started with Pinterest and then found myself making headway watching some great videos from the actual brands of the makeup I was using. Don’t worry, I’ll link those up later in the post!

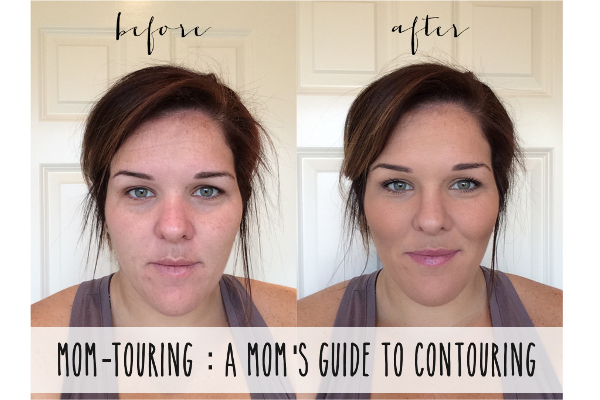
After a few good attempts at it, learning what works for my skin tone and face shape I ::to my surprise:: came out with what you see in the pic below and couldn’t be happier with it! So here we go! Take a look at my take on contouring and good luck giving it a try!
DISCLAIMER: This girl is not a pro, at all……BUT I did do a test run for a sweet girl at Sephora who gave me the go-ahead on passing on my routine to all the lovely Red Stick Moms!
Products
So first, products! Because that’s where it’s all at! I used everything pictured below and will add in that I slowly purchased my little stash. With most of the items being a bit pricey, I made sure to add more affordable options in case you are starting from scratch. Though it looks like a lot at first, don’t worry….some products are optional and others are applied very minimal to get you that contoured mama look!
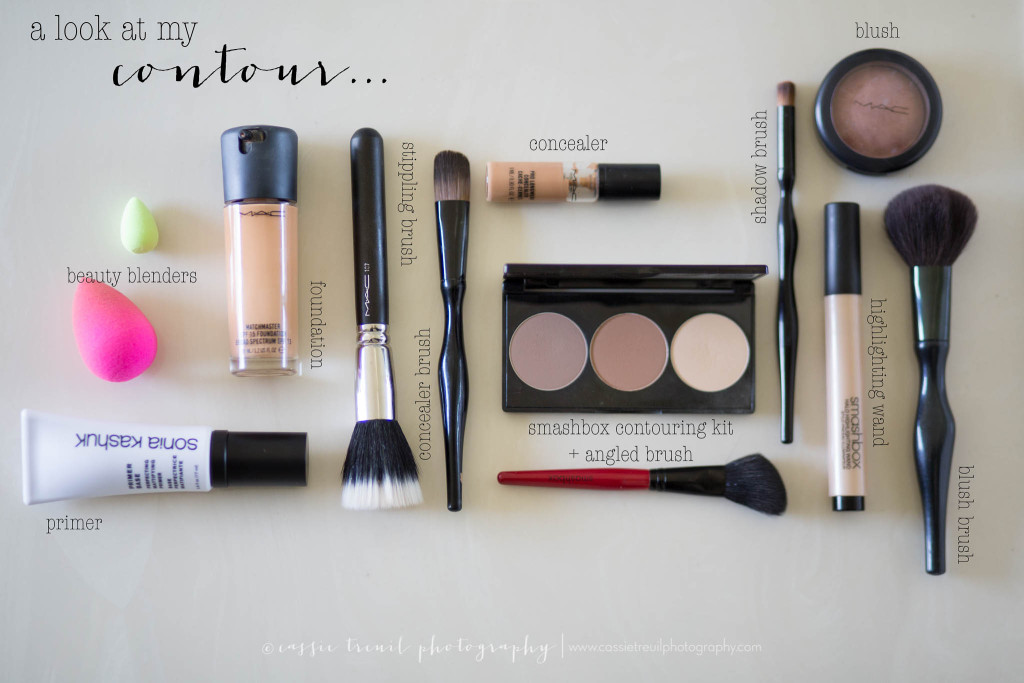
Like I mentioned earlier, I did a lot of research making sure to grab the best products without wasting money spent. I’ve added my input on each item that I could not live without and those that can be skipped over or replaced with a more affordable alternative.
- Primer – Sonia Kashuk Perfecting Illumination Primer {You’ll notice Sonia laced throughout this list, her brand is a really great one that’s easy on the wallet. I really love using a primer not only because it helps my makeup stay put but it makes applying makeup way easier. Instead of it getting help up in dry spots, it all applies evenly and makes blending that much easier. Not a must have but at $14, it’s hard to pass up.}
- Foundation – Mac Pro Longer Foundation {Foundation is always a must! Foundation evens out skin tone and gives you a nice even palette to start building your look with. I’d give you a cheaper option but everyone is different, I’ll leave this choice up to you.}
- Stippling Brush – Mac 187 Duo Fibre Face Brush {A must? Yes and no. I love the way using a stippling brush to apply my foundation works. I can apply my make up in a way that’s a little less harsh on my skin yet use it to build without looking caked on. So yes to the stippling brush but no to the splurge. A more affordable brush is always a great thing….Sonia Kashuk No 115 Large Duo Fibre Brush at Target.}
- Concealer – Mac Pro Longwear Concealer {So, I can’t say this for everyone but concealer is a must for me. As a mama to three little boys, the amazing coverage of my dark under eye circles is worth it. I purchased it in a shade lighter and it gives me a little highlight under my eyes as well, helping out the contouring process.}
- Concealer Brush – Sonia Kashuk No 05 Foundation Brush {Yes, this is a foundation brush but I find it works great on applying concealer. Not a must have at all but nice to have when needed.}
- Beauty Blender & Minis – beautyblender and micro.mini {I wouldn’t say that these necessarily are a must but I do like to have one type of regular blender to help blend out those spots that don’t look natural. I’ve also used the Sonia Kashuk Blending Sponge from Target, just as great for a fraction of the price.}
- Contouring Kit w/ Angled Brush – Smashbox Step-By-Step Contour Kit {Y’all, GET THIS! It’s what makes my contouring post what it is today. It is most definitely is a must have to me and made the entire process so easy! It features three shades for defining, bronzing, and highlighting any complexion. So not only is it versatile, it is pretty affordable given the fact that you have three shades in one kit, the angled brush and the contour by face shape guide. Worth. every. penny.}
- Shadow Brush – Sonia Kashuk No 08 Crease Shadow Brush {In my opinion not a must at all. I use it to apply the contouring to my nose. Any small shadow brush works for this.}
- Highlighting Wand – Smashbox Halo Highlighting Wand {This product I feel can be done without but it can’t be replaced. I definitely think in this case that a little splurge is worth the pretty glow it gives your highlight areas.}
- Blush and Brush – This one is pretty simple and I won’t link anything to it only because everyone is different. I’ll let you do the deciding on this one!
- Setting Spray – Mac Fix+ {Another one of the “don’t really HAVE to haves” but I will add in that to me, I can’t go without it! I’m not someone who touches my makeup all during the day. I put it on and wash it off, nothing in between so having a setting spray is so beneficial to me. A quick mist after my makeup is done and it stays put way longer than going without. I’ve also used the more affordable e.l.f. Makeup Mist & Set from Target.
Whoop! We made it through! Now that you have an idea of what to use we can move forward to the fun stuff!
Contouring How-To
So let’s get started! Below I’ll go through each step in as much detail as I can. I’ll also link the video that really helped me in mastering those contours, getting the shadows and highlights spot on. My favorite thing about this is that it’s quick…15 minutes at the absolute most. So if your anything like me, a diaper change or sippy refill will be somewhere in the middle of blush and mascara but that’s it!
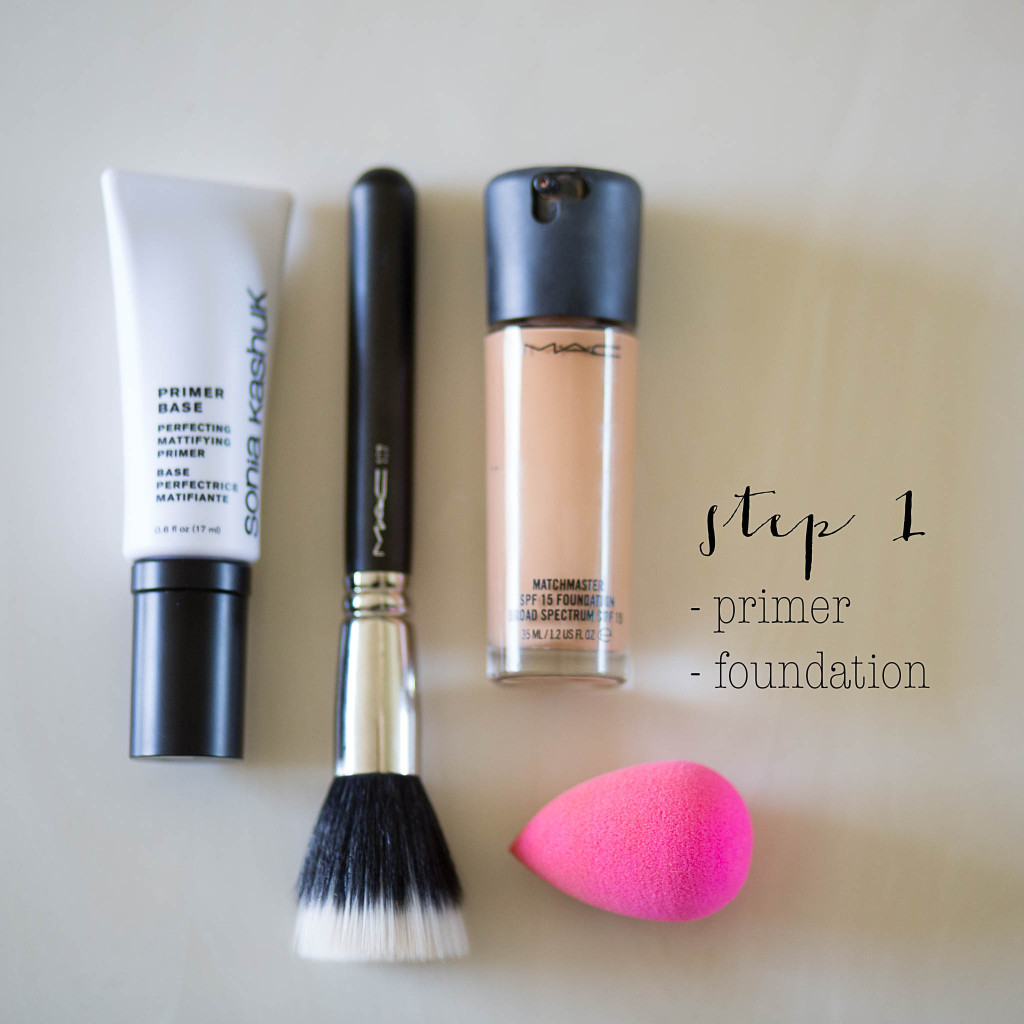
Step 1
– Starting with a clean face, apply your primer first then your foundation with your stippling brush. The option to build your coverage with the stippling brush is so convenient. You can apply your foundation light for a day date or a little darker for an evening out. I then use my beauty blender to blend out those spots that are hard to cover evenly, creases by my nose and around my hair and jaw line.
{TIP! With your beauty blender, wet it first then squeeze it out in a dry towel. This make a world of difference when trying to blend.}
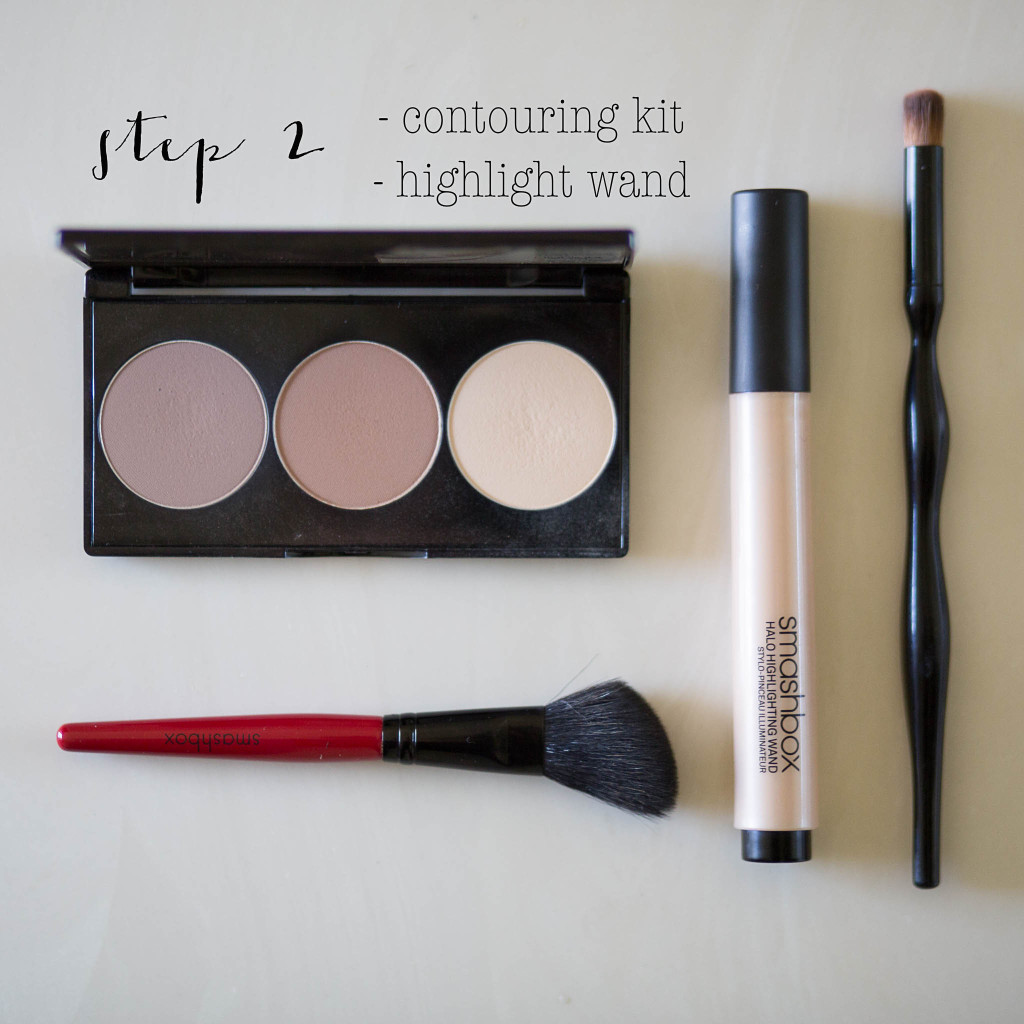
Step 2
– Time to contour! First, start with face shape. This takes a HUGE part in how to contour so it flows correctly with your bone structure. If you purchased the smashbox kit, it comes a super convenient guide for each shape but if you didn’t, take a look at this guide to figure out what shape you fall under. Next, take a look or two at this video I found on the Smashbox site that I felt was the absolute best tutorial on how to maximize the contouring kit as well as get it spot on. Seriously y’all, this video is saved on my phone! It came in super handy when I gave it my first few tries.
– I start with my cheeks. Start by sucking in your cheeks and remember to follow the hallow! Doing this helps find the perfect hallow from your ear to the corner of your mouth. Using the contour shade, apply along this line and blend upward. This creates the look of sculpted cheek bones by using shadows…..sculpted, I’ll take it! Next, apply the bronze shade to the top of your cheek contour to add warmth and blend out the contour lines even more. I finish them off by blending with my beautyblender to soften the contouring. Like the video above says, always remember to “blend blend blend like it’s your friend friend friend!”.
– Up next I contour my nose and add highlight. Using the eyeshadow brush, apply the contour shade down the two sides of your nose and blend with a beautyblender. Next, I do all my highlighting at once. With the highlighting wand, add a line down the bridge of your nose from the top to the ball of your nose (this draws light to the center of your nose to make it look straighter), under your eyes/above your cheek bones, your cupid’s bow (the curve of the upper lip that creates that little indention), and lastly on your forehead right between your brows and about midway up creating somewhat of an upside down triangle. I finish this all off with my beautyblender, giving it a more natural glow.
{TIP! I don’t use the highlight shade in my contour kit as my only means to highlight. I use my highlight wand and top my highlighted areas with the highlight shade in the kit to finish it off and dial down the shimmer a bit. }
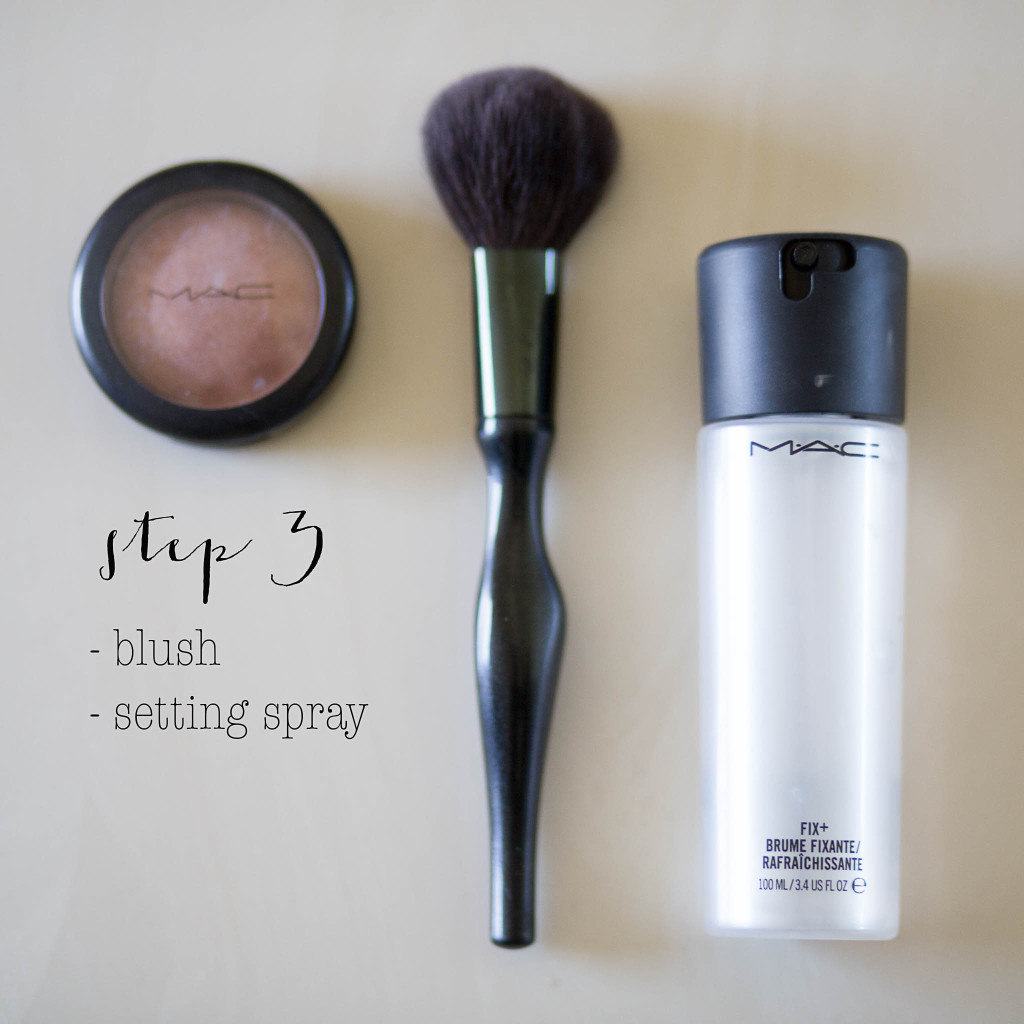
Step 3
– Now, the easy part. Finishing off your contour! Using your blush brush, apply blush to the apples of your cheeks (making sure to smile) then finish it all of with a light mist of your setting spray.
…..and that’s it! From here add anything else you’d like. A little eyeshadow and mascara, whatever your heart desires!!! I hope my spin on contouring helps you on that special day or night out! Good luck!


thanks, you should make a tutorial to go along with this!!
Ahhh such a good idea Rebekah! I’ll have to be on the hunt for someone with super camera skills to video me while I apply it 🙂
Cassie, you are so talented! I’m hooked! I enjoy ever post.
Keep up the good work!
Love you,
Linda
(Lindsey’s Mom)
i definitely think a video would be more helpful to include.